Making the Lap
We are now ready for the polishing lap. First, cut a strip of newspaper at least 20″ long, and 14″ wider than the thickness of the tool; run it through some melted paraffin and set it aside. This is to serve as a collar, to be wrapped around the tool to retain the hot pitch while it sets. Now melt the pitch slowly on the stove, in a pot or can. It is highly inflammable, so keep the flame low, and have on hand a board or other cover that can be immediately placed over the pot to smother any flames. Use a wide, thin stick for stirring. If a can is being used, it may be gripped with a pair of pliers while pouring. When the pitch is fully melted, pour a large drop onto a piece of scrap glass and let it cool. Try denting it with your thumbnail. If after about 15 seconds of pressure, there is hardly any indentation, the pitch is too hard; too soft if it has yielded easily. Some mirror makers use the bite test, although this is less determinate than the thumbnail test. Chip the cold drop of pitch free from the glass and place it between the teeth. If it immediately shatters into fragments under pressure, it may be too hard. There should be just the slightest yielding before breaking. The surest way to find out about the temper is to go ahead and make the lap, and see how it works in polishing.
To soften pitch, add just a few drops of turpentine. Do not do this over the stove. It takes very little turpentine for this, so use it cautiously. Stir thoroughly and again try the temper. To harden pitch, cook it for a long period. Adding a quantity of rosin will harden it. No two pitches are alike, so exact proportions cannot be given, but the amount of rosin added ought not to exceed the volume of pitch. Some laps are made entirely of rosin; these are most suitable for hot climates.
While the pitch has been melting, partially fill the pail (which has been thoroughly cleaned out) with water as hot as the hands can tolerate, and completely immerse mirror and tool, standing them on their edges and resting them against the sides of the pail, so that they can be quickly reached when wanted. Have a piece of soap on hand in a clean dish. The tool and mirror should be allowed to heat through before you pour the lap. After the pitch has been fully melted and tempered, remove it from the stove and allow it to cool slightly, as it is best not to pour boiling hot pitch directly onto the tool. Now remove the tool from the hot water, dry it, and wrap the paraffined paper collar around it. There should be enough heat in the glass to cause the overlapping ends of the collar to adhere. Give the pitch a final thorough stirring and pour it onto the tool up to the level of the collar. When it has thickened enough to retain its shape, remove the collar.
|
|
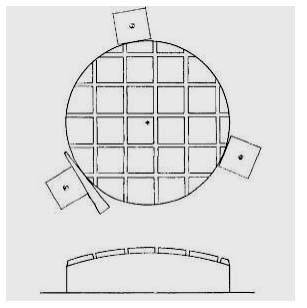
Soap the channeling tool and press the channels into the warm pitch right down to the glass, as in Fig. 27. Start at the center, and locate the first channels so that the center of the lap will lie just inside one corner of a square. This is to avoid a uniform radial distribution of the squares, and so prevent zonal rings on the mirror. Press the channels in one direction first, then press the other set at right angles. Take the mirror from the hot water, quickly soap its surface, and slide it about on the lap, gradually increasing the pressure. The channels will be closing in now, so replace the mirror in the hot water, and go over the channels again. Follow with the soaped mirror. These steps may have to be repeated two or three times before the lap has hardened sufficiently to retain its shape. By proper manipulation, any tendency for concavities to develop in the squares can be ironed out. By the time the pitch has hardened, the lap should exactly conform to the curve of the mirror. Remove the mirror and wash it off in clear water.
Using a sharp knife, with a firm shearing stroke cut away the pitch overhanging the edge of the tool. Incline the knife so as to give a slight bevel to the lap. The knife, or a razor blade, can be used to widen any channels that may have closed in. Do this cautiously or large fragments of pitch may break out. A good width for the channels is 1/8″. Flush the lap under a cold-water tap to clean off the soap and any pitch fragments, and dry it. Melt down some beeswax in a can. Prepare a brush for the wax: a thin stick of wood the same width as the squares, with a chisel-shaped edge, over which three or four thicknesses of gauze bandage or similar material are wrapped and tied with string. Soak this in the melted beeswax (which should be smoking hot) and draw it across the lap, covering each square with a single stroke of the brush. Two or three squares can be done on a single dipping. While the mirror might be polished directly on the pitch or rosin lap. Llic beeswax coating gives a faster, sleek-free polish, and results in a better edge. (Sleeks, or micro-scratches, faintly visible on a polished surface, may result from coarse particles in the rouge.)
A Better Lap
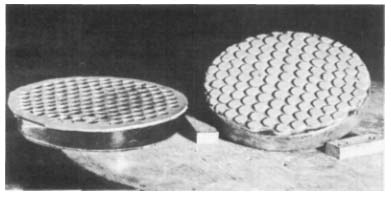
The channeled pitch lap just discussed is the conventional one used by both amateur and professional mirror makers in the past. The one about to be described (Fig. 28) originated at Pennsylvania State College. Introduced into the Amateur Astronomers Association workshop at the Hayden Planetarium by the author, it has been coming into general favor. The amount of effort involved in making the rubber mold may appear to be unreasonably out of proportion to the result, but experience has demonstrated that the time spent will pay dividends. Contact is easily made and kept; the lap polishes faster than the channeled lap; and it responds more agreeably to the figuring strokes. The reservoir of water and polishing agent surrounding the facets tends to equalize temperatures and retard evaporation, with the result that turned-down edge rarely occurs. Because of the considerably smaller areas of the individual facets, a somewhat harder pitch than that used for the conventional lap is employed. Less than a third of the usual amount of pitch is needed, and the rubber mold will make innumerable laps.

|
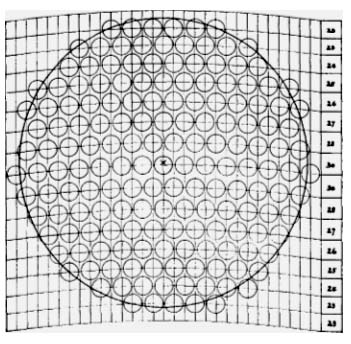
Sheet rubber, about 7″ square and 1/16″ thick, will do for the mold, the pattern for which is shown in Fig. 29. A saddler’s punch, of ⅜” to 7/16″ diameter, or a No. 4 cork borer, is a good size for making the holes. The radius of the horizontal arcs shown is 24″, but straight lines, rather than curved, might just as well be used. The separations given are for ⅜” holes, and should be suitably varied for a punch of different size. The pattern is first laid out on a sheet of thin paper, and a 6″ circle then drawn, encompassing as many whole small circles as possible. The pattern is then pasted to the rubber mat with mucilage. When dry, the mat is laid on a thick magazine and the holes are punched out. To cut out the partial holes on the periphery of the 6″ circle, lay the mat over the edge of a board, with the periphery of the circle and the board’s edge coincident. By placing the punch carefully over a circle there, an arc of any size can be cut, and the segment of rubber cut out with a knife or razor blade. Trim the mat to within 3,4″ of the holes. Remnants of the paper pattern can be removed by soaking the mat in water.

|
The operation of making the lap is best done on top of a scrap piece of windowpane or other sheet glass. So that the facets will not squeeze down quickly, the pitch for this lap should be on the hard side. When melted, the pitch should be removed from the stove and allowed to cool briefly, and be thoroughly stirred before pouring. Have the mirror and tool in a pail of hot water while the pitch is melting. Lay the mat on the clean sheet of glass, and paint it all over with a light creamy mixture of rouge1 and water. While the pitch is cooling, remove the mirror from the hot water and dry it, then place it on the sheet of glass, face up, and paint its surface and sides with rouge. Lay the rouge-coated rubber mat on it, carefully centered. Take the tool from the hot water, dry it and place it nearby, convex side down. Quickly pour the hot pitch over the mat, starting at the center and spiraling outward nearly to the edge. Then, carefully centering the warm tool convex side down over the mirror, set it onto the pitch and press it firmly down to the rubber mat, squeezing the excess pitch out over the sides. After about a minute, invert the disks, and after a similar wait, slide the mirror off. Allowing sufficient time for the pitch to harden, lift the mat from the lap. with a gentle stretching and pulling, carefully, so as not to break any edges off the facets. Trim around the edge of the lap with a sharp knife, flush it clean of rouge and pitch fragments, dry it and coat the surfaces of the facets with smoking hot beeswax. All of this takes about 15 minutes, less than half the time and fuss needed for the conventional lap. By working on a sheet of glass, messiness is avoided, and the surplus pitch can be recovered and returned to the pot.
The theory of the graduated spacing (see diagram) is that an oblate spheroid can be brought spherical by concentrating the strokes on the diameter of greatest facet density, and that a spherical mirror can be similarly parabolized. There would be no walking around the barrel, but necessity for rotating the mirror and pressing frequently to maintain a surface of revolution on the lap. But therein lies the rub: a similar surface must be present on the mirror. And so, because of the ever-present danger of an astigmatic surface resulting from this method, the above theoretical practice is not recommended. Used in the normal way, the graduated spacing permits a wider range of stroke than is possible on the channeled lap; thus “zones” are almost entirely eliminated, and the spherical and paraboloidal figures are more easily obtained.
Looking ahead, we find that this mat cannot be used for the lap for the diagonal mirror; the reader may therefore want to consider deviating from the above instructions. (See The Lap, in Chapter 8.)
Making Contact
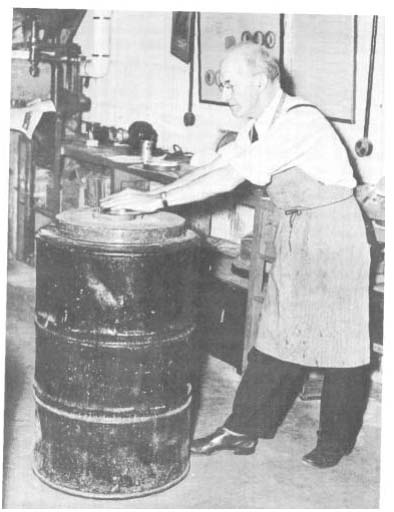
Before polishing can begin, the newly made lap must be immersed in hot water for three or four minutes (five minutes or more for the channeled lap) in order that the pitch may be slightly softened. In the meantime, the barrel top should be fitted with three wooden cleats (Fig. 27); and a clean sheet of paper, with cutouts to fit over the cleats, might be placed on top. Put a spoonful or two of rouge or other polishing agent in a clean jar, add water and stir. Use a small paint brush to apply the mixture (a creamy application for the initial charge) to the face of the mirror. (Watch out for loose bristles.) Remove the lap from the hot water and wedge it firmly between the cleats. Immediately place the charged mirror on top and work it back and forth with pressure for a few seconds in order to embed the polishing compound in the waxed surface of the lap. Then, with the mirror centered on the lap, place a weight of about 20 pounds on top of it, and allow it to press for about 15 minutes, or until all of the heat has gone out of the tool. This process is known as hot-pressing, and should precede each day’s polishing operation, the purpose being to bring the surfaces of lap and mirror into contact at every point.
Incongruous results in figuring sometimes occur, traceable to a temporary deformation or bending of the mirror induced by unequal loading during the pressing period. The deformation is impressed into the lap, and therein lies a source of unforeseen trouble. To avoid this and insure equal distribution of the weights, they should rest on a 6″ square or round board which has three pegs, such as rubber-head tacks, driven into it 120° apart in a centrally inscribed circle of 21/8″ radius. The pegs, in turn, rest on the mirror.In putting the lap away for the night, the free polishing compound should be flushed off, and a cover placed over the lap. Nothing, not even the finger tips (save perhaps a clean sheet of paper intended as a cover), should be allowed to come into contact with the surface of the lap.

|
In the next lesson, you will learn about polishing, testing and correcting the mirror…
